⚡ Temtem Stamina Calculator
Plan three turns of STA costs, passive recovery, Rest timing, gear or trait support, and overexertion HP damage before a risky battle line.
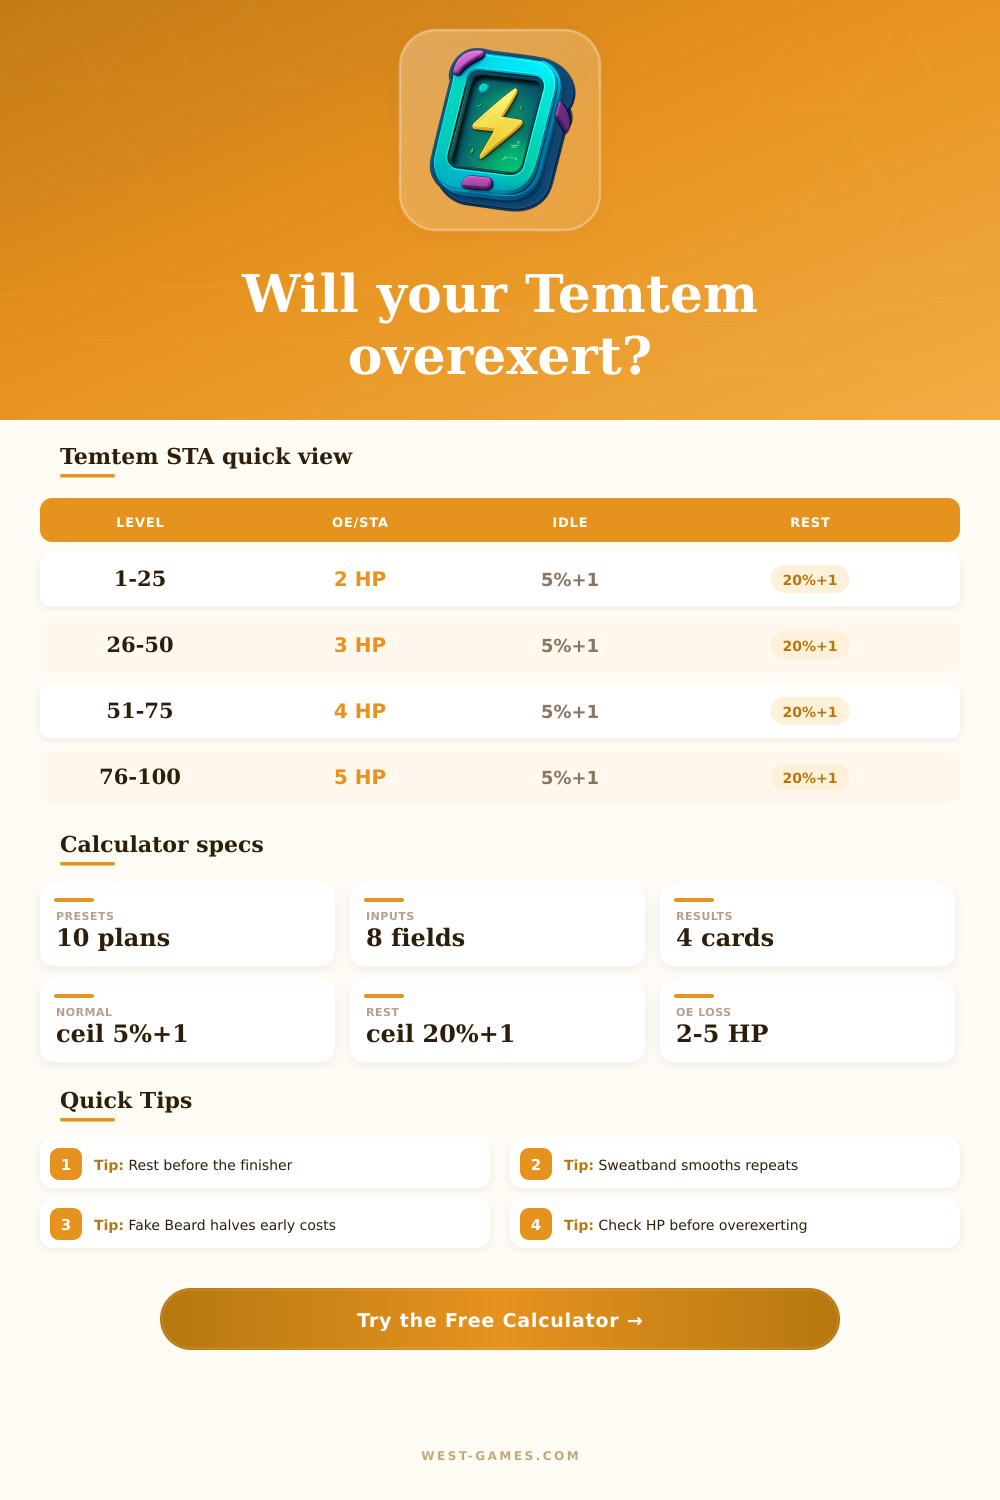
| Level | HP per missing STA | Example 6 STA short |
|---|---|---|
| 1-25 | 2 HP | 12 HP loss |
| 26-50 | 3 HP | 18 HP loss |
| 51-75 | 4 HP | 24 HP loss |
| 76-100 | 5 HP | 30 HP loss |
| Cost band | Battle meaning | Planner use |
|---|---|---|
| 0-12 STA | Light utility or pass-like action | Good filler after a burst |
| 13-24 STA | Common support or mid-pressure move | Usually safe with normal recovery |
| 25-36 STA | Heavy attack or tempo swing | Watch turn three carefully |
| 37+ STA | Major finisher or expensive control | Often needs Rest, Invigorated, or gear |
| Package | Modeled effect | Best use |
|---|---|---|
| Sweatband | +5 STA at each turn start | Repeating mid-cost techniques |
| Patient | +15% max STA after hold-style use | Hold techniques and stable cycles |
| Fake Beard | Invigorated halves costs for turns 1-2 | Front-loaded burst plans |
| Adrenaline Shot | Prevents first overexertion penalty | One planned overexertion finisher |
| Resilient | Flags once-per-battle KO safety | Last-hit overexertion checks |
| Rest turn | Turn 2 spends 0 and recovers Rest STA | Preparing a turn 3 finisher |
| Max STA | Normal turn | Rest turn |
|---|---|---|
| 40 STA | 3 recovered | 9 recovered |
| 60 STA | 4 recovered | 13 recovered |
| 80 STA | 5 recovered | 17 recovered |
| 100 STA | 6 recovered | 21 recovered |
| 120 STA | 7 recovered | 25 recovered |
| Preset | Max STA | Costs | Support | Intent |
|---|---|---|---|---|
| Momo Turbo Opener | 74 | 32 / 27 / 29 | Normal recovery | Fast opener into follow-up pressure |
| Kinu Protector Sustain | 83 | 23 / 18 / 31 | Patient hold cycle | Support sequence without losing tempo |
| Nagaise Hypnosis Lock | 69 | 26 / 20 / 34 | Fake Beard | Control opening with reduced early cost |
| Seismunch Uppercut Finisher | 61 | 28 / 33 / 41 | Adrenaline Shot | Accept one risky final overexertion |
| Tuvine Crystal Spike Cycle | 77 | 24 / 30 / 30 | Sweatband | Repeated crystal pressure line |
| Volarend Toxic Plume Pivot | 87 | 29 / 19 / 36 | Rest on turn 2 | Reset STA before a large toxic turn |
| Oceara Tsunami Burst | 58 | 35 / 30 / 44 | Fake Beard | Very expensive burst check |
| Rhoulder Stone Wall | 71 | 22 / 26 / 38 | Resilient | Bulky closer with overexertion safety |
| Minothor Spark Rush | 80 | 31 / 31 / 31 | Sweatband | Even pressure across three attacks |
| Yowlar Hibernate Stall | 94 | 18 / 0 / 39 | Rest on turn 2 | Stall then spend a large finisher |
Stamina management in Temtem is a necessary skill because the stamina of a Temtem determine whether it can continue to use its techniques or if that Temtem will be required to undergo the Rest penalty. A player uses stamina when they utilize a technique with that Temtem, as well as if they use a swap move with the Temtem. Due to the slow recovery rate of stamina, as well as the costs of overexertion, players must monitor the stamina of their Temtem to avoid the costs of overexertion.
The stamina calculator is a tool that performs mathematical calculations for a player. To use the stamina calculator, a player enters information regarding the level of the Temtem, the maximum stamina that it can possess, the current stamina value of that Temtem, and the costs of the next three technique that they would like to use. Based upon these entries, the stamina calculator can calculate whether overexertion will occur, and also calculate the health point loss that will result from overexertion.
How to Use the Stamina Calculator
This tool is helpful for players because the game does not display the stamina of a Temtem after it has recovered. The level of a Temtem have an impact on the amount of damage that the Temtem will take from overexertion. A Temtem with a higher level will take more damage from overexertion per point of stamina that it does not have, as compared to a Temtem with a lower level.
Additionally, the higher level Temtem will usually have a large stamina pool. Thus, the relationship between the Temtem’s costs of techniques and its stamina pool will change throughout its match. The stamina calculator displays both the cost of stamina per point of health, as well as the amount of stamina that will be gained from either normal recovery or Rest actions.
Some of the gear that a player may have for their Temtem will impact the stamina that is used during the match. For instance, a Sweatband will add to the stamina of a Temtem at the start of its turn, which allows it to use medium cost techniques more often. Additionally, a Fake Beard will halve the cost of the first two techniques that the Temtem uses.
The Patient trait will grow the stamina pool of a player after they perform a qualifying action, rewarding the player for those actions. These pieces of gear are not displayed on the technique cards for the Temtem, thus the stamina calculator is the tool that players use to calculate the impact of these gear items on stamina use. A Temtem can recover its stamina from two main actions within the game.
During normal recovery, the Temtem regains a small amount of stamina after each turn. This amount is typically not enough for Temtem to pay for utilize a heavy cost technique during their turn. During the Rest action, a Temtem can regain a large amount of stamina, but it will not perform any actions during its turn.
These two actions can be modeled within the stamina calculator for three turns in advance, allowing the player to decide whether using the Rest action is a good use of time or a waste of time during the match. Many players tend to make mistakes in the game with their Temtem. Some players may focus upon whether or not their current turn will be paid for with their stamina, yet do not account for whether or not they will have enough stamina to pay for their next turn.
Other mistakes that players may make are to plan a sequence of moves that their Temtem will perform, but do not account for the Rest penalty that their Temtem will experience as a result of overexertion. Additionally, overexertion will force the Temtem to Rest during the following turn. Thus, the stamina calculator represents these future states of their Temtem, so that the players are aware of these potential future states of their Temtem.
Overexertion will result in the Temtem losing some of its health points. However, overexertion will also result in the Temtem gaining a penalty to its tempo for the remaining match. After overexertion, the Temtem will have to Rest during its next turn (unless prevented by some special effect).
Thus, the stamina calculator also represents this penalty, as well as the risk grade for the Temtem. This risk grade is provided as a way to help the player understand the risks of overexertion and to make certain that they do not base their decision solely on health point numbers. Another potential value of the stamina calculator is in the ability of players to compare the value of two different sequences of techniques.
For instance, one sequence may require the player to utilize a series of aggressive techniques during the first two turns of the match, but require the player to have enough stamina to recover for the third turn. Alternatively, the other sequence may include taking a Rest action during the second turn, allowing for the player to utilize a heavy cost technique at the end of the match after the Rest action. The stamina calculator helps players to determine which sequence will result in the loss of the least amount of health points by the Temtem.
If incorporated into the strategy of a player during matches with Temtem, the stamina calculator will provide value to that player. The player will manage stamina more effectively, rather than as a single number. In longer matches between two players, the player who has one extra point of stamina will be able to use their final technique, while the opponent will have be forced to perform a Rest action.
Thus, this small number of stamina can be the difference between winning or losing the match.