🎯 Hunt: Showdown KDA Calculator
Calculate your Kill/Death/Assist ratio & analyze your combat performance
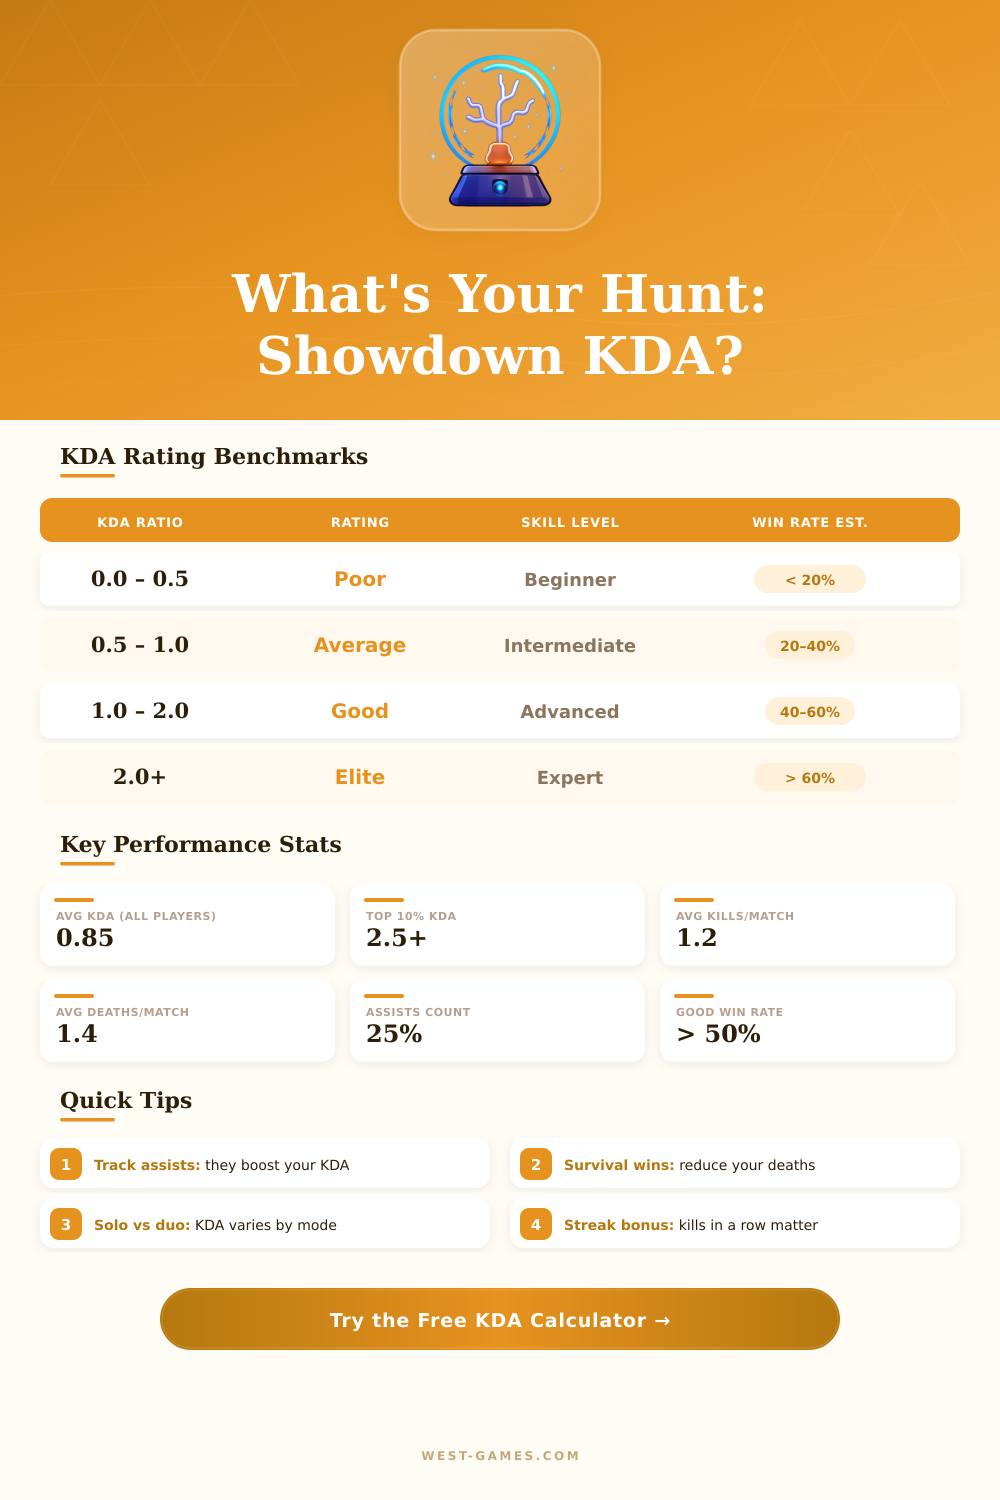
| KDA Range | Rating | Skill Level | Est. Win Rate | Notes |
|---|---|---|---|---|
| Below 0.5 | Poor | New Hunter | < 15% | Focus on survival over aggression |
| 0.5 – 0.8 | Below Average | Learning | 15–25% | Work on positioning & map knowledge |
| 0.8 – 1.0 | Average | Intermediate | 25–35% | Consistent performance, room to grow |
| 1.0 – 1.5 | Good | Experienced | 35–50% | Solid combat & tactical skills |
| 1.5 – 2.0 | Very Good | Advanced | 50–60% | Strong PvP fundamentals |
| 2.0 – 3.0 | Excellent | Expert | 60–70% | Top-tier hunter performance |
| 3.0+ | Elite | Pro-Level | > 70% | Exceptional combat mastery |
| Mode | Avg KDA | Avg Kills/Match | Avg Deaths/Match | Good KDA Target |
|---|---|---|---|---|
| Solo | 0.75 | 1.0 | 1.3 | > 1.2 |
| Duo | 0.90 | 1.3 | 1.4 | > 1.4 |
| Trio | 1.05 | 1.6 | 1.5 | > 1.6 |
| Action | KDA Impact | Difficulty | Priority |
|---|---|---|---|
| Reduce unnecessary deaths | High | Medium | ⭐ Must-Do |
| Secure assist tags | Medium | Low | 👍 Easy Win |
| Play with experienced teammates | High | Low | ⭐ Recommended |
| Practice headshots | Medium | High | 🎯 Long-Term |
| Learn map rotations | Medium | Medium | 🗺 Tactical |
| Use sound cues for positioning | High | Medium | 🔊 Key Skill |
| Avoid open-field engagements | High | Low | 🛡 Survival |
It’s the docks at Barlow Hollow. It’s Hunt Showdown. It’s a shooter, sure, but it’s also an exercise in nerves and resource management. You’ll convince yourself that your skill comes solely from number of enemies you take down. But that’s not the case. That’s where the stats come in.
Plug them in and let the calculator do the math. It saves you from having to account for things like mode variations and assists during play, especially while experience of that nail-biting encounter by the sawmill is still fresh. It also makes sense of what would otherwise be a jumble of sessions.
How This Tool Helps You Play Better
Players think about their kill count when they should of thinking about how much it costs them to get those kills. Death in this game is final for that run and very costly. You may have gotten five kills but died three times prior to getting your bounty out. You realy weren’t performing well at all. People misunderstand that aspect. They run around going for head shots and don’t pay attention to position.
We look at the trade-off between your deaths, assists, and kills. We then give you a single number ratio that shows your real efficiency different than just your aggression. Assists is sometimes overlooked by solo players who don’t like giving up any credit for themselves, but they’re important when playing with others (duo/trio). You can tweak how much they impact your overall score via the calculator. By default, they count for half the points a kill would provide. That makes sense; assisting someone in taking down an enemy is still helpful, even if you didn’t deal death blow yourself.
For better or worse, teaming up is a big part of staying alive as the game progresses past first few minutes. If you go in guns blazing, dying quickly won’t help your session average regardless of how many assists you earn. So what do those numbers mean? The reference section includes several benchmarks that give context to those stats.
If your number is less than one, you’re dying more frequent than killing enemies. As a result, you’re probably just rushing into fights before scoping out the area (that’s typical for new hunters). Two or greater, on the other hand, means someone with a grasp of both patience and position. Those aren’t random points, it marks transition between surviving via dumb luck versus excelling thanks to skill.
How do you know where you compare to rest of field? Average is about one point two, so check out that stat to determine whether your recent struggles are part of normal variance or a product of poor habits. The ratios is typically going to be lower in solo play because there’s no teammate to have your back, and you’re facing off against up to eleven other people alone. To adjust for that, the tool lets you choose which mode you want to compare yourself to. That way you can make sure you’re being compared to the appropriate peer group.
Inflating your numbers with risky plays so you can pretend you get same kind of stats as a trio is a good way to get frustrated. Better to think about your rate of extraction over time instead. This is where consistency pays off more than highlights do. Rarely does improving your ratio involve getting better at shooting. More often it involves being a smarter player. Keeping your ratio down is as much about not engaging with other players you don’t have to engage with as it is staying alive.
How many extra kills do you need to reach that target? That’s where the calculator comes in. But the lesson learned here is that increasing your ratio isn’t just about hitting the number, it’s about minimizing your number of deaths. Fewer deaths means less lost bounty and more room for upgrading. This economic pressure define the difference between good and great hunters.
You can set goals within the interface. That way, you’re able to keep track over several sessions. See if your new playstyle/loadout change is doing anything. Rather than having to guess, you’ll have numbers that say “yes, your survival rate is increasing.” That’s important because it provides a feedback loop that will help you improve. No more guesses, just adjustments with evidence.
But then again, it’s all about the numbers, isn’t it? A large ratio means you were disciplined and patient. A small ratio means you were impulsive. Use the tool to help explain that story. Just remember: live long enough to walk away with some money in your pocket. That’s what winning realy looks like in Barlow Hollow. And when the fog rolls back in, your stats will be there waiting for you…if you know where to look.