Leather Armor Dye Calculator
Estimate dye volume, dilution, coats, absorption waste, drying batches, and color depth for leather armor props, cosplay pieces, and game-inspired kits.
🎮Armor Dye Presets
🧪Dye Setup Inputs
Leather Armor Dye Results
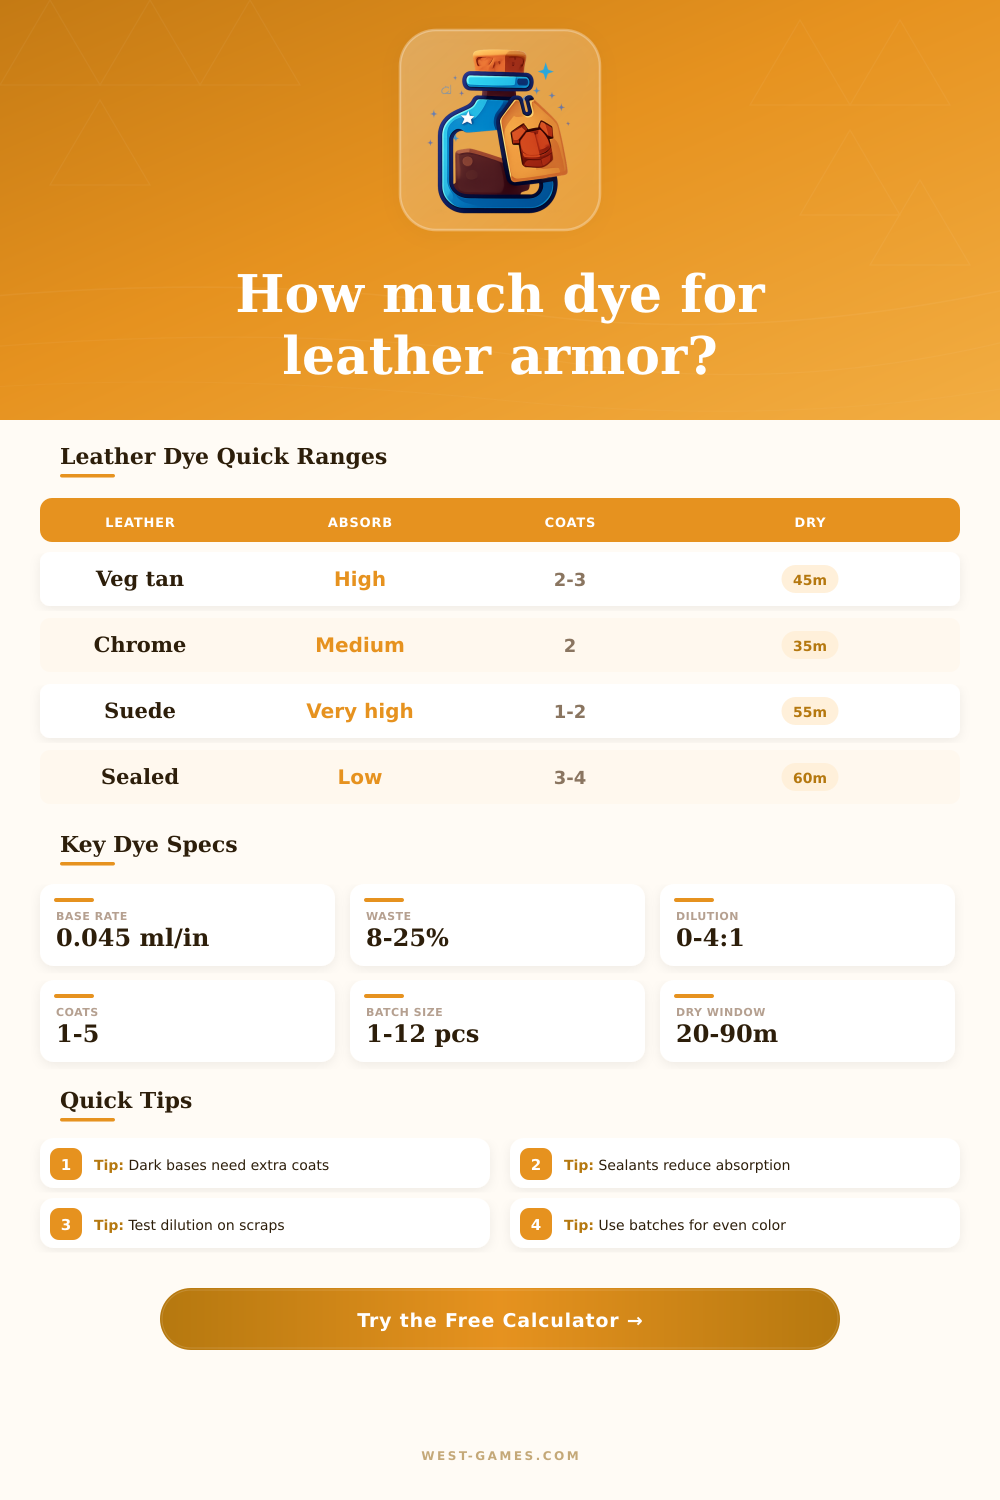
📊Current Material Spec Grid
📘Leather Absorption Reference
| Material | Absorption Factor | Compatibility | Best Dye Behavior |
|---|---|---|---|
| Vegetable-tanned leather | 1.15x | 92 / 100 | High penetration, strong color, predictable coat stacking. |
| Chrome-tanned leather | 0.95x | 78 / 100 | Moderate penetration; surface prep helps evenness. |
| Suede or roughout leather | 1.45x | 84 / 100 | Consumes more dye and darkens quickly because fibers stay open. |
| Sealed or finished leather | 0.55x | 48 / 100 | Needs deglazing or specialty dye; absorption is limited. |
| Bonded leather panels | 0.70x | 42 / 100 | Patchy uptake; keep coats light and test edges first. |
| Faux leather vinyl | 0.25x | 25 / 100 | Most dyes sit on top; paint systems usually perform better. |
⚙Dilution And Coat Planning
| Goal | Typical Dilution | Suggested Coats | Calculator Effect |
|---|---|---|---|
| Light wash or weathered armor | 3:1 to 5:1 | 1 to 2 | Lower color depth, larger working mix, easier blending. |
| Standard dyed armor | 1:1 to 2:1 | 2 to 3 | Balanced stock use with manageable drying time. |
| Deep faction color | 0.5:1 to 1:1 | 3 to 4 | Higher depth score and more risk of uneven dark seams. |
| Saturated boss armor | 0:1 to 0.5:1 | 4 to 5 | Maximum dye load; extend drying and buff between coats. |
🛡Armor Piece Area Benchmarks
| Armor Piece | Small Prop Area | Hero Prop Area | Planning Note |
|---|---|---|---|
| Chest panel or cuirass section | 160 to 260 sq in | 280 to 460 sq in | Count front, back, straps, and overlap tabs separately. |
| Bracer or forearm guard | 45 to 85 sq in | 90 to 150 sq in | Edges absorb heavily, so waste allowance matters. |
| Greave or boot cover | 70 to 130 sq in | 140 to 240 sq in | Curved pieces often need thinner, repeated coats. |
| Helmet trim, belts, and straps | 20 to 60 sq in | 65 to 120 sq in | Batch similar strap lengths together for consistent shade. |
🧰Material And Spec Comparison Grid
| Spec | Vegetable Tan | Chrome Tan | Finished Or Faux |
|---|---|---|---|
| Color correction range | Wide; accepts light to dark builds | Medium; darker shifts are easier | Narrow; surface color dominates |
| Absorption waste risk | Medium; edges and tooling drink dye | Medium-low with scuffed surface | High for failed coverage and wipe-off |
| Drying batch pressure | Moderate; fiber holds carrier | Moderate-fast if coats are thin | Slow if coating remains tacky |
| Best calculator setup | 2 to 4 coats, 1:1 dilution, 12% waste | 2 to 3 coats, 1.5:1 dilution, 15% waste | 3 to 4 coats, low absorption, 25% waste |
💡Practical Dye Calculation Tips
To dye your leather armors evenly, you must understand how different types of leather will take dye. Dyeing your leather armor evenly is importance to ensure that there are no streaks of dye or blotches on the armor. To evenly dye your leather armor, you must account for the leather type, the base color of the leather, the dilution of the dye, and the drying times required for each coat of dye.
The type of leather will determines how much dye that leather will absorb. Vegetable-tanned leather will absorb the dye quite deep into the leather. Chrome-tanned leather will absorb less dye than vegetable-tanned leather, so ensure that you scuff the surface of the chrome-tanned leather before dyeing it.
How to Dye Leather Armor Evenly
Suede and roughout leather will absorb a lot of dye as the nap of the suede and roughout leather remain open and allows the dye to enter the leather. To dye sealed or finished leather, you will need to strip the top layer of the sealed or finished leather to allow the dye to penetrate. The base color of the leather will also affect the dye appearance on the leather.
Pale or cream leather will allow every coat of dye to show on the leather. Medium and dark brown leather will contain some pigment in the leather, so more dye will be required to achieve the required color for the armor components. Black leather will absorb alot of dye but will not change the colors of the leather.
Hence, you will adjust the volume of dye that you will use on black leather. The dilution of dye and the number of coats will determine the final color of the leather armor. A light wash of dye will use a highly ratio of diluent to dye.
It will use one or two coats of dye for easy visibility of the armor edges and seams. Standard armor dye will use a one-to-one or two-to-one ratio of dye to diluent and will use two or three coat of dye to give the armor color without it looking like plastic. A deep color will use more strength in the dye and apply more layer of dye, but more layers will pose the risk of liquid becoming trapped in the seam of the armor.
Each coat of dye requires time to dry before you can apply another coat to the leather armor. Ensure that the suede or aged leather take longer to dry than chrome-tanned leather as chrome-tanned leather will dry faster. Ensure that you have enough rack space to allow each piece of leather armor to dry without it touch other pieces of leather armor.
A percentage of dye will be wasted in the dyeing of the armor leather. The edges and tooling marks on the leather will absorb more dye then the flat panel areas of the leather. Some of the dye will also become trapped in the sponges and brushes used to dye the armor leather.
Hence, you will account for a percentage of dye waste in your calculations to ensure that you have enough dye to complete the projects.