Remnant 2 Armor Calculator
Plan armor pieces, encumbrance, dodge class, armor DR, elemental resistances, archetype traits, relic fragments, amulet and ring modifiers, and effective survivability.
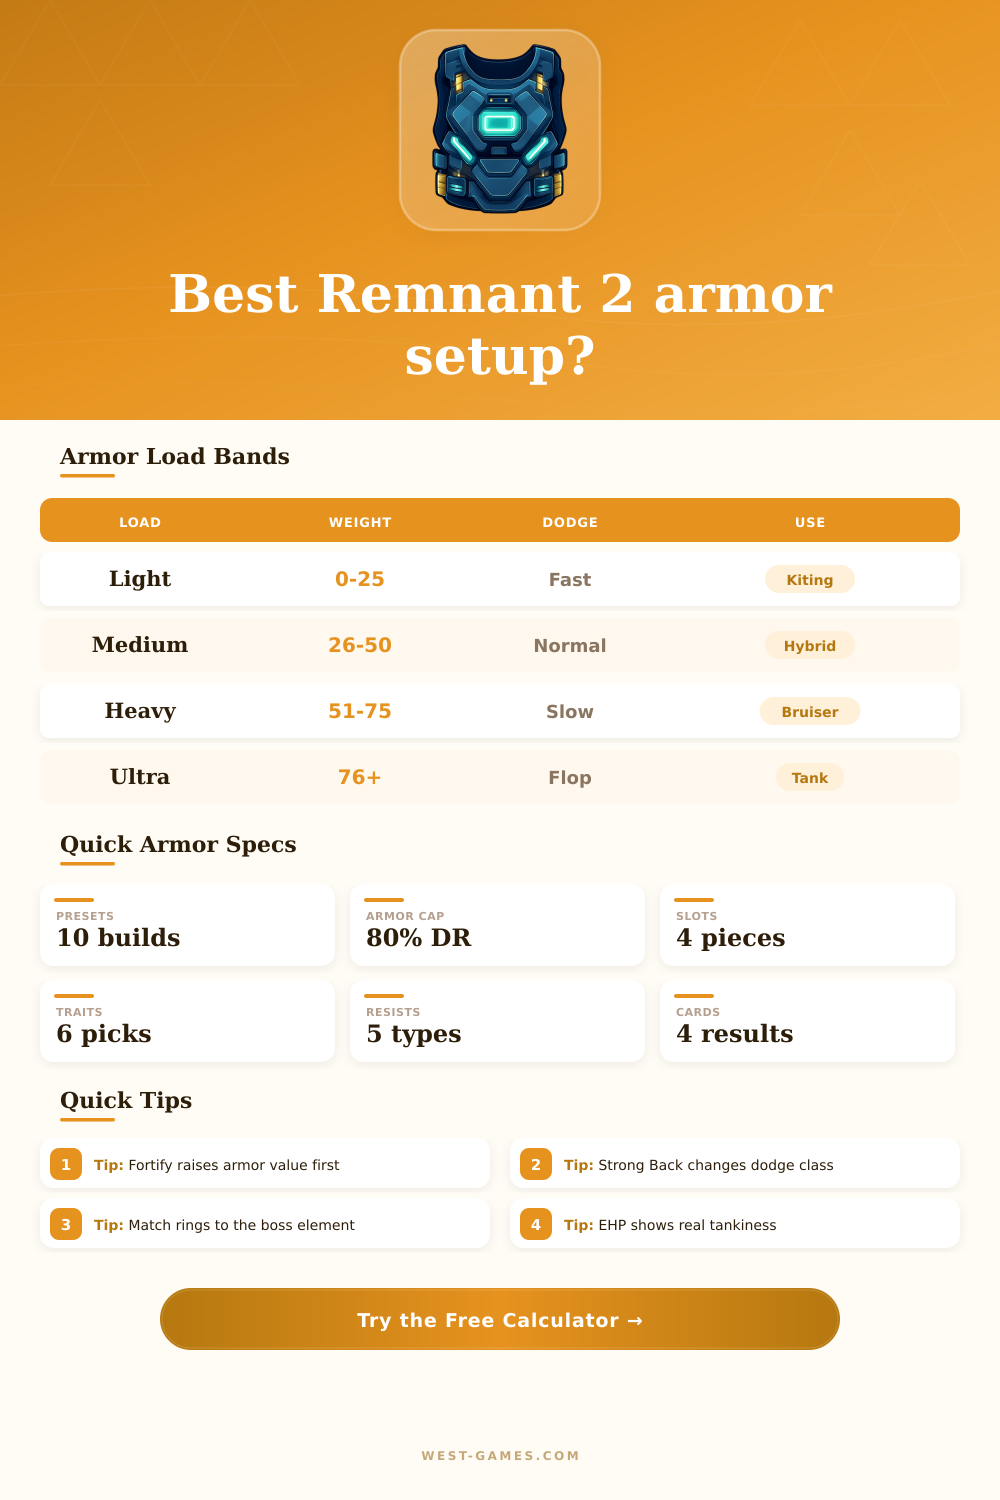
| Weight class | Effective weight | Dodge behavior | Stamina penalty | Typical use |
|---|---|---|---|---|
| Light | 0 to 25 | Fast roll with best recovery | Lowest penalty | Weakspot builds, kiting, glass cannon support. |
| Medium | 26 to 50 | Standard roll with normal recovery | Moderate penalty | Balanced campaign and co-op builds. |
| Heavy | 51 to 75 | Heavy roll with slower recovery | High penalty | Bruisers using Fortify, Bulwark and sustain. |
| Ultra heavy | 76 and up | Belly flop unless reduced | Severe penalty | Leto-style tanks or builds using Strong Back. |
| Armor family | Set profile | Resistance lean | Calculator note |
|---|---|---|---|
| Realmwalker | Very light travel gear | Low but flexible | Strong for dodging, weak if hit repeatedly. |
| Dendroid | Light root-themed pieces | Bleed and blight lean | Good for mobile builds that still want some status coverage. |
| Academic | Medium support armor | Corrosive and blight lean | Comfortable for co-op medic and alchemist style builds. |
| Technician | Medium-heavy plating | Shock lean | Useful when armor value matters more than perfect dodge speed. |
| Zealot | Ritualist style gear | Fire and blight lean | Pairs well with status-heavy encounters and sustain rings. |
| Leto Mark II | Ultra-heavy plating | Broad resistance coverage | Massive armor value, but weight needs Strong Back or tank intent. |
| Modifier type | Input field | How the calculator applies it | Build impact |
|---|---|---|---|
| Fortify and armor bonus | Armor bonus level | Increases armor value before armor DR is calculated. | Best on already sturdy sets because it scales the base armor pool. |
| Relic fragment DR | Relic fragment flat DR | Stacks as non-armor DR in the total DR model. | Raises effective health without changing dodge class. |
| Amulet DR | Amulet defensive modifier | Added to the non-armor DR pool before the cap check. | Useful when you are close to the 80 percent reduction ceiling. |
| Ring DR | Ring defensive modifiers | Can be positive or negative depending on ring tradeoff. | Shows risky damage rings that quietly lower survivability. |
| Bulwark | Bulwark stacks active | Uses a stack table and joins the non-armor DR pool. | Strong during uptime, but do not overvalue it when stacks drop. |
| Damage lane | Resistance tracked | Useful armor examples | Planning advice |
|---|---|---|---|
| Bleed | Bleed resistance | Dendroid, Red Widow, Fae Royal | Prioritize when enemies apply repeated bleed ticks. |
| Fire | Fire resistance | Zealot, Realmwalker, Leto Mark II | Useful for burning arenas and flame-heavy bosses. |
| Shock | Shock resistance | Technician, Trainer, Fae Royal | Good when projectiles and arcs chain through the room. |
| Corrosive | Corrosive resistance | Academic, Red Widow, Elder | Helps against armor-melting status pressure. |
| Blight | Blight resistance | Elder, Zealot, Academic | Important in worlds where blight stacks limit uptime. |
Light Dodge Build
Wins by not getting hit, then converting stamina into damage windows.
Medium Hybrid
Balances armor value, resistance swaps and normal roll recovery for general play.
Heavy Bruiser
Accepts slower dodges to survive burst hits and stay active in close range.
Leto Tank
Uses massive armor, Strong Back and flat DR to push EHP near the cap.
Armor in Remnant 2 is a system that you can tune before you enter a combat encounter. Armor is importance because armor has an impact on the amount of damage you will take in combat, as well as how you will move within the game. There are two choice to make regarding armor: whether to choose light armor or heavy armor.
Each of these armor selections provide different benefits to the character. These planning tools will help you to form an image of how armored you will be in combat, as well as how mobile you can expect yourself to be. There are two main mechanics to the armor system: your raw armor value and your weight total.
How Armor Works and How to Use the Armor Calculator
Your raw armor value will determine the damage that you will take in combat, whereas your weight total will determine your dodge class. These two factors works in opposing manners within the armor system; the more armor that you have, the more weight that you will have. The more weight that you have, the more slower that you will be able to roll, as well as the more stamina that you will expend in rolling.
However, armor calculators will allow you to avoid performing these calculations yourself; simply enter your armor pieces and modifiers, and the calculator will provide you an output for your total armor value and the amount of damage that you will take. Furthermore, the armor calculator will also calculate for you any non-armor values that may reduce your armor, such as relic fragments, amulet effect, and Bulwark stacks. Players of the game can make some mistakes when they are choosing their armor pieces.
One of the most common mistakes is to use the heaviest armor possible; while this may provide the character with an increase in health, it can reduce the players mobility. The other common mistake is to wear the lightest armor possible to maintain movement; however, the player may die quick from the lack of armor. Planning tools will allow the player to see these options and there outcomes prior to choosing armor.
Beyond the armor system itself is the layer of elemental resistance that must also be considered. Many of the boss in the game contain specific status effects that the player must be resistant to in order to defeat them. Armor sets may provide high reductions for neutral damage, but the player may still die if they are in an area with fire or corrosive pools.
The armor calculator will allow players to choose the type of damage that is incoming into the player, and it will use the player’s armor to calculate the resistance to that specific type of damage. Choosing the correct type of damage is crucial to ensure that the armor build is playable in the game. In addition to armor pieces, traits also have an impact upon the function of the armor pieces that the player wears.
For instance, the Fortify trait can increase the player’s armor value before the damage reduction formula, which makes it more effective if combined with heavy armor pieces. Similarly, the Strong Back trait can reduce the player’s total weight before the dodge class is calculated, which allows for the player to wear heavy armor without too much of a negative impact upon mobility. These can be tested with the armor calculator to help players decide what will work best with their character.
There are four main weight classes within the game: light, medium, heavy, and ultra heavy armor. Light armor allows players to have quick and fast rolls and recoveries from damage. Medium armor is the middle ground between light and heavy armor; it allows players to have decent armor and movement.
Heavy armor allows for players to remain in melee with enemies without dying immediately. Finally, ultra heavy armor is the most weighted armor type; it is generally only used if the player has the Strong Back trait, or if they dont mind losing mobility at all. The armor calculator will allow players to see into which weight class they are fall.
Effective health is the measurement of the amount of damage that a player can take before they die. Effective health isnt as simple as health multiplied by damage reduction; there are other stats in the game that may factor into a player’s effective health. Armor calculators can calculate a player’s effective health, allowing them to compare different armor sets to determine which will allow the player to last longer than dying from combat damage.
Planning tools have some limitations within the game. For instance, the armor calculator can ensure that the player obtains the desired amount of weight and armor; however, it cannot account for temporary buffs to any stat. In other words, the player will still have to make small adjustments to their character sheet in order to achieve their desired stats.
In general, armor should be balanced between the need for mobility versus damage mitigation. While the highest armor value is the ultimate goal for many players, it is also important to consider the number of hit that a player can take before dying while remaining mobile. The armor calculator will help players to find this balance.