🖥️ GPU Stress Test Duration Calculator
Find out exactly how long to stress test your GPU based on your purpose, GPU tier, and cooling setup
| Test Purpose | Minimum | Recommended | Thorough / Full | Notes |
|---|---|---|---|---|
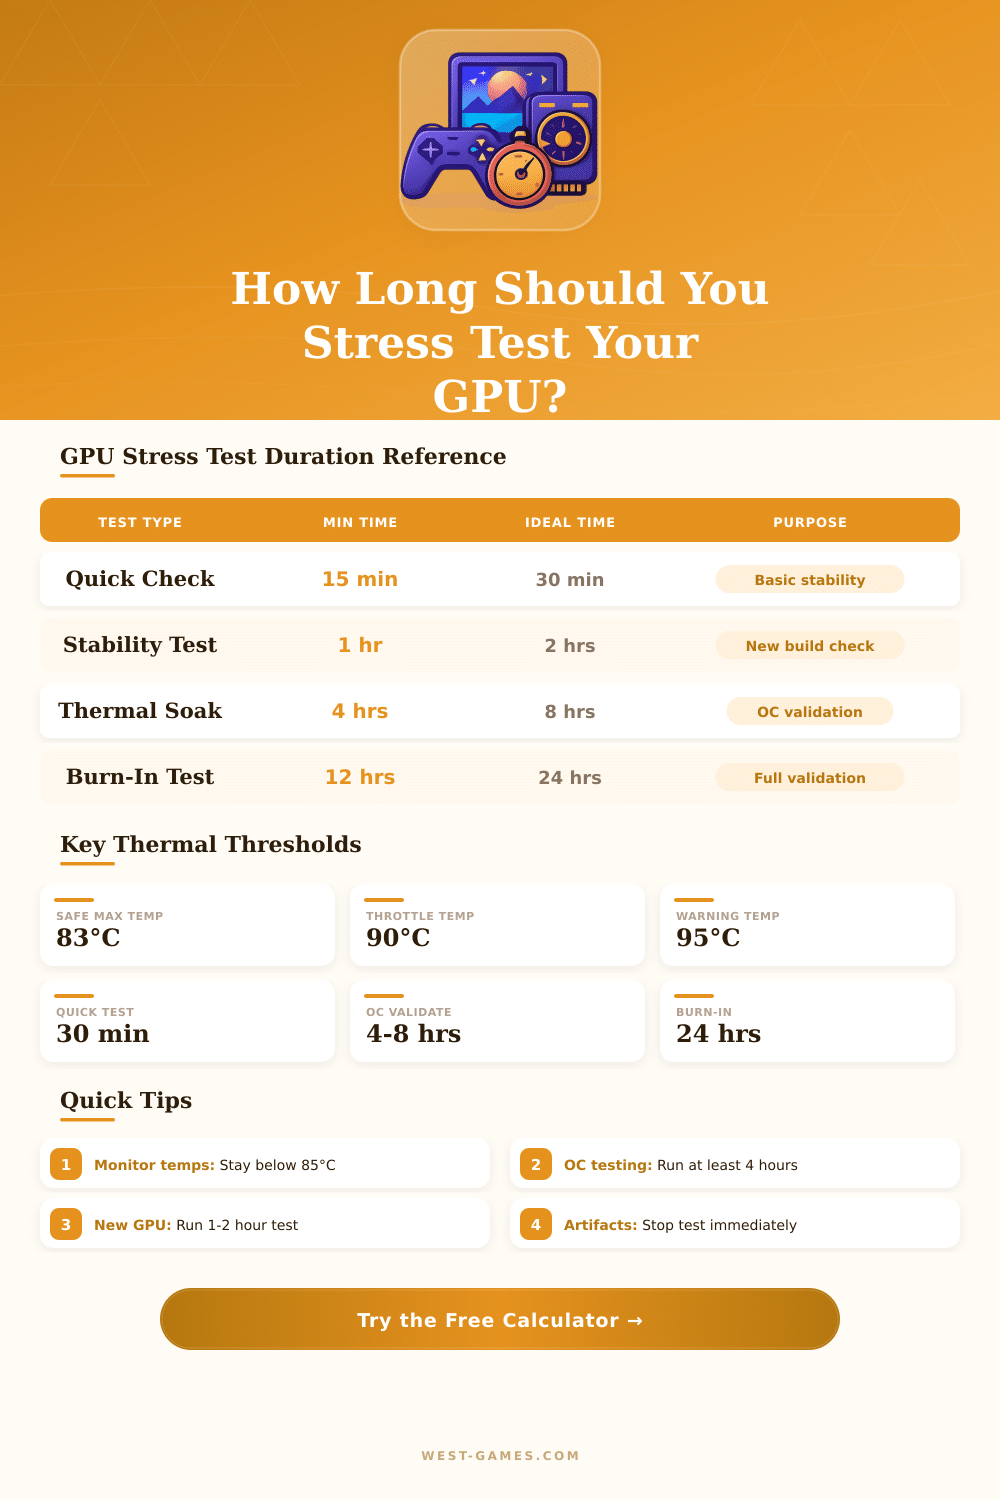
| Quick Sanity Check | 15 min | 30 min | 1 hr | Verify basic function, no artifacts |
| New Build Verification | 1 hr | 2 hrs | 4 hrs | Confirm thermals & stability |
| Overclock Validation | 2 hrs | 4 hrs | 8 hrs | Must reach thermal saturation |
| Full Burn-In / Stability | 8 hrs | 12 hrs | 24 hrs | Hardware defect detection |
| Pre-RMA / Defect Check | 30 min | 2 hrs | 4 hrs | Reproduce artifact / crash |
| After Repair | 1 hr | 3 hrs | 6 hrs | Validate repair success |
| Mining / Compute Rig | 4 hrs | 8 hrs | 24 hrs | Sustained load simulation |
| GPU / Cooling | Normal Load Temp | Max Safe Temp | Throttle Point | Emergency Shutdown |
|---|---|---|---|---|
| Budget GPU (AIR) | 65–75°C | 83°C | 90°C | 100–105°C |
| Mid-Range (AIR) | 68–78°C | 84°C | 90°C | 100–105°C |
| High-End (3-fan AIR) | 65–75°C | 83°C | 88°C | 100–105°C |
| Flagship (AIR / WC) | 60–72°C | 80°C | 87°C | 100°C |
| Laptop GPU | 75–88°C | 88°C | 93°C | 100°C |
| Reference / Blower | 78–85°C | 87°C | 92°C | 105°C |
| Water Cooled | 40–60°C | 70°C | 83°C | 100°C |
| Tool | GPU Load | Realism | Thermal Saturation | Best For |
|---|---|---|---|---|
| FurMark | 100% (extreme) | Low | 5–10 min | Worst-case thermal check |
| 3DMark TimeSpy / FireStrike | 85–95% | Medium | 20–30 min | Benchmarking + stability |
| OCCT GPU Test | 95–100% | Medium-High | 10–20 min | OC validation, long runs |
| Unigine Heaven / Superposition | 90–98% | Medium-High | 15–25 min | OC & visual artifact check |
| MSI Kombustor | 95–100% | Low-Medium | 10–15 min | Quick thermal peak test |
| Actual Game Loop | 70–90% | Very High | 30–60 min | Real-world stability |
| OC Level | Core Clock | Minimum Test | Recommended Test | Pass Criteria |
|---|---|---|---|---|
| Stock | +0 MHz | 30 min | 1–2 hrs | No artifacts, stable temp |
| Mild OC | +50 to +100 MHz | 2 hrs | 4 hrs | No crash, no visual errors |
| Moderate OC | +100 to +200 MHz | 4 hrs | 8 hrs | Zero errors in OCCT log |
| Aggressive OC | +200 MHz+ | 8 hrs | 24 hrs | 24-hr pass, no temp spike |
Note: This article is based on reliable data gathered from several sources about tools and modes for GPU stress test.
A stress test for GPU pushes the graphics card to its highest limits over long time. The main goal is not to measure speed, but ensure stable mode, good cooling and running without mistakes under strong load. Testing the stability of a graphics card is among the most useful modes to check it in harsh conditions.
How to Stress Test Your GPU
We strongly suggest a stress test of a new GPU to ensure that everything works properly.
FurMark is one of the most popular programs for this task. Furmark 2 follows the original FurMark and offers a very harsh stress test for GPU, available on Windows and Linux. It also works as a quick tool for OpenGL and Vulkan graphics with scores online.
The program fits to strain the GPU and check for artifacts. It is small easy and fast to try, but do not use it more than one or two minutes, because it puts the GPU under full load, which can cause overheating in some cards.
OCCT forms another solid option. It works as an all-in-one stress test tool with steady and changing tests, plus built-in error checking. Searching for visible artifacts stays the old method, which does not always work, because a GPU can breek down without clear visual signs.
OCCT also offers a test for VRAM, that almost no other tool gives. The free version limits to one-hour stress tests. It copies gaming situations, extremes and heavy loads, while it catches all mistakes during the run.
Tools like Heaven and Valley are simple tools to stress test a graphics card. Superposition shows itself as a solid choice, running it in 8K with best settings on your computer helps to properly set the GPU speed. There is even a free website-based GPU stress test tool, that works fully in the browser using JavaScript and WebGL, without need of downloads.
Ezbench, a free tool based on Unreal Engine 5 for games, is available in Steam as another option four testing.
3DMark does not just do ratings. It has a detailed stress test section. The program shows live graphs about GPU load, temperature and clock speed, that you watch during the test.
If the GPU crashes, stutters or causes visual artifacts during the test, that can signal a problem with stability. In cases of overheating and shutdowns, you may need better cooling.
Real games matter too. Beyond synthetic stress tests, they do not ensure good performance in real use. Portal RTX and Cyberpunk quickly show unstable overclocks.
Monitors for GPU, like HWMonitor, HWiNFO and GPU-Z, should run together with any stress test, to watch temperatures, clock speeds, voltage and power use. Testing until the GPU core reaches around 80 degrees Celsius forms areasonable stopping point.